
Alpha Masking with FFMPEG
Before I dive into the topic of alpha channel masking in ffmpeg, I should explain what this document is. I’m writing it as a blog post however, I want it to document what I know about how alpha masking is accomplished in FFMPEG.
Warning: Video examples in this post use VP9 with an Alpha channel. At the time of writing, only Firefox and Chrome based browsers will support the content. Edge users (as of April 12, 2020) will see the video but will not see the alpha channel. Safari users will need to convert the videos to H.265 somehow to get the equivalent effect.
Basics of Alpha Channel
When we want something that we are filming or recording to be transparent, the technology I think we use most often is a thing called chroma keying. You will probably have seen stages or sets with large swathes of green or blue fabric draped all over the place dyed to a specific colour such that computers can be programmed to recognize that colour in video and automagically strip it from the recording. This is what lets visual effects guys make Superman fly, or X-Wings zip through a Death Star trench run. Since we cannot literally make the world transparent, the chroma keying is a clever hack to pretend that it is.
Digital media is different though, since pretend pixels don’t have any basis in reality we can just specify certain areas of images as transparent without worrying about matching colours to an arbitrary “this should be invisible” palette.
The degree to how much any given pixel should be transparent is indicated by it’s alpha channel. Typically, in most digital imagery we use an 8-bit alpha channel (256 shades of transparent). Alpha blending is one of the most simple and widely used mechanisms for compositing digital imagery, and it describes the process of combining translucent foreground images with opaque background images.
Support for alpha channels in many media codecs is limited because of historical implementation decisions. For instance, the ubiquitous jpeg format has no internal support for alpha transparency whatsoever, nor does h.264 (often called mp4 which is actually just a cardbox box you can shove movies into). Some digital tools will implement chroma keying instead of alpha blending because of technical limitations of these common data codecs.
Many codecs don’t include alpha channel support since the imagery the designers envisioned encoding with those codecs doesn’t have any transparency in them. For instance, consider any digital camera, since the real world that the camera is recording is not transparent, the format that the camera will save its image too has no need to support an alpha channel layer. Whichever photons arrive at the camera are the ones that colour and shade the image.
In digital video, the modern codecs that I know support an alpha channel are VP9 from Google, Prores 4444 and h265 from Apple (and others). Support for these codecs is rather mixed when I am writing these words. Moreover the Prores variant is not intended for digital distribution, it’s a format intended for storing high quality intermediary or raw files for editing.
Clear so far? Maybe, but this discussion of codecs isn’t done yet. We have compatibility issues to sort out still.
Digital Cardbox Boxes
It is time to talk about containers. I used to get very confused why some videos I would download from the internet that had a familiar file extension would play on my computer and some would not, despite sharing the same familiar file extension.
I originally encountered this with the AVI file extension, some videos would play and others would complain about something to do with codecs? Well it turns out that videos stored as AVI aren’t actually a fixed format, rather it was a storage container where people could put a variety of audio or video content encoded with different technologies. My computer simply did not have the software installed to understand all the various types of encoded video that it was encountering. So despite the fact my computer could open and understand an AVI file, it did not understand the particular language with which the contents were written.
This problem is even more complicated today than it was in 1992 when I first started having these issues.
There are LOTS of different container formats these days (.mov, .mp4, .mkv, .webm, .flv and many others). Most containers can store a massive variety of different video and audio formats. For instance the prolific h.264 format, can easily be stored in most of the containers listed above. Software support for all the various containers is extremely mixed. Even worse is the support for the actual formats themselves.

Alpha channel support in video codecs
Ok so lets just imagine you are a mere mortal and want to create an animated video clip with an alpha channel, what are you options today (April, 2020)?
I think it’s correct to say that there are at least 3 codec categories:
- Capture
- Intermediate
- Distribution
A capture format would be like the raw video from a digital camera or an animation project format in something like blender or other animation suite. Intermediate formats (like ProRes) are great for editing video clips because their internal storage layout allows tools to quickly decompress and scrub through their contents without causing extra load on the computer at the cost of increased storage requirements. Distribution codecs (like h.264, vp8 and vp9), do a great job at compressing the video stream, at the cost of requiring extra computation time to render each individual frame.
Intermediate codecs with alpha channel support
| Format | ffmpeg | Resolve | FinalCut | Premier |
|---|---|---|---|---|
| ProRes4444 | Full | Partial | Full | Full |
| Cineform | Decode | Full | ? | ? |
| DNxHR | No Alpha | Full | ? | ? |
| QTRLE | Full | None | Full | ? |
| TIFF | Full | Full | Full | Full |
Warning: ProRes4444 export from Davinci Resolve is only supported on linux and Mac platforms (at time of writing, April 2020).
ProRes4444 is probably the most widely supported intermediate stage codec, but since I cannot export ProRes4444 files from my Windows Davinci Resolve suite, using it requires some extra effort.
Actually, and this really surprised me, the best supported cross-platform way of storing intermediate video files for animation is to actually not use a video format at all and instead just save a large collection of compressed TIFF images for each rendered frame and just pretend it’s a video like you may have done with children’s animated flip books as a youth.
Distribution codecs with alpha channel support
| Format | ffmpeg | Resolve |
|---|---|---|
| HEVC H.265 | No Alpha | Decode |
| VP8 | Full | None |
| VP9 | Full | None |
H.265 is the upcoming replacement to H.264 and does support an alpha channel in its specification but toolchain support for that technology is really only available on Apple platforms when I am writing these words.
Warning: H.264 does NOT support alpha channel and is not included here.
Note: ffmpeg does actually have an h.265 encoder via a third party library but now it does not support alpha channel to my knowledge, though I would be happy to be proven wrong about this.
Currently there is no widely available distribution type codec that supports an alpha channel that works across all devices but VP9 does have a massive adoption base from all recent versions of Chrome and Firefox. Presumably, since Edge already supports VP9 it will add alpha channel support at some point in the future, but today it does not support VP9 alpha blending.
Codec Choices Summary
As best I can tell from experimentation and researching throughout the public Internet, ProRes4444 has the most toolchain support across common platforms. However, using sequences of compressed TIFF images is completely supported in every editing tool and is probably the best way to store intermediate video content for later editing if maintaining an Alpha Channel is important
For archiving and web purposes VP9 can be used in every modern version of Firefox and Chrome, and has official (but not bundled by default) support from Microsoft. Apple users can use H.265 but toolchain support for creating those videos with Alpha Channel is very thin now.
Practical Examples of Alpha Channel Video
So far we’ve identified a few codecs and technologies we can use to keep track of transparency in videos. Lets take a look at how the ffmpeg tool is used practically to create animated video content with an alpha channel. Then we will dive into animating and masking existing videos with ffmpeg.
Using FFMPEG to Encode VP9 with Alpha Channel
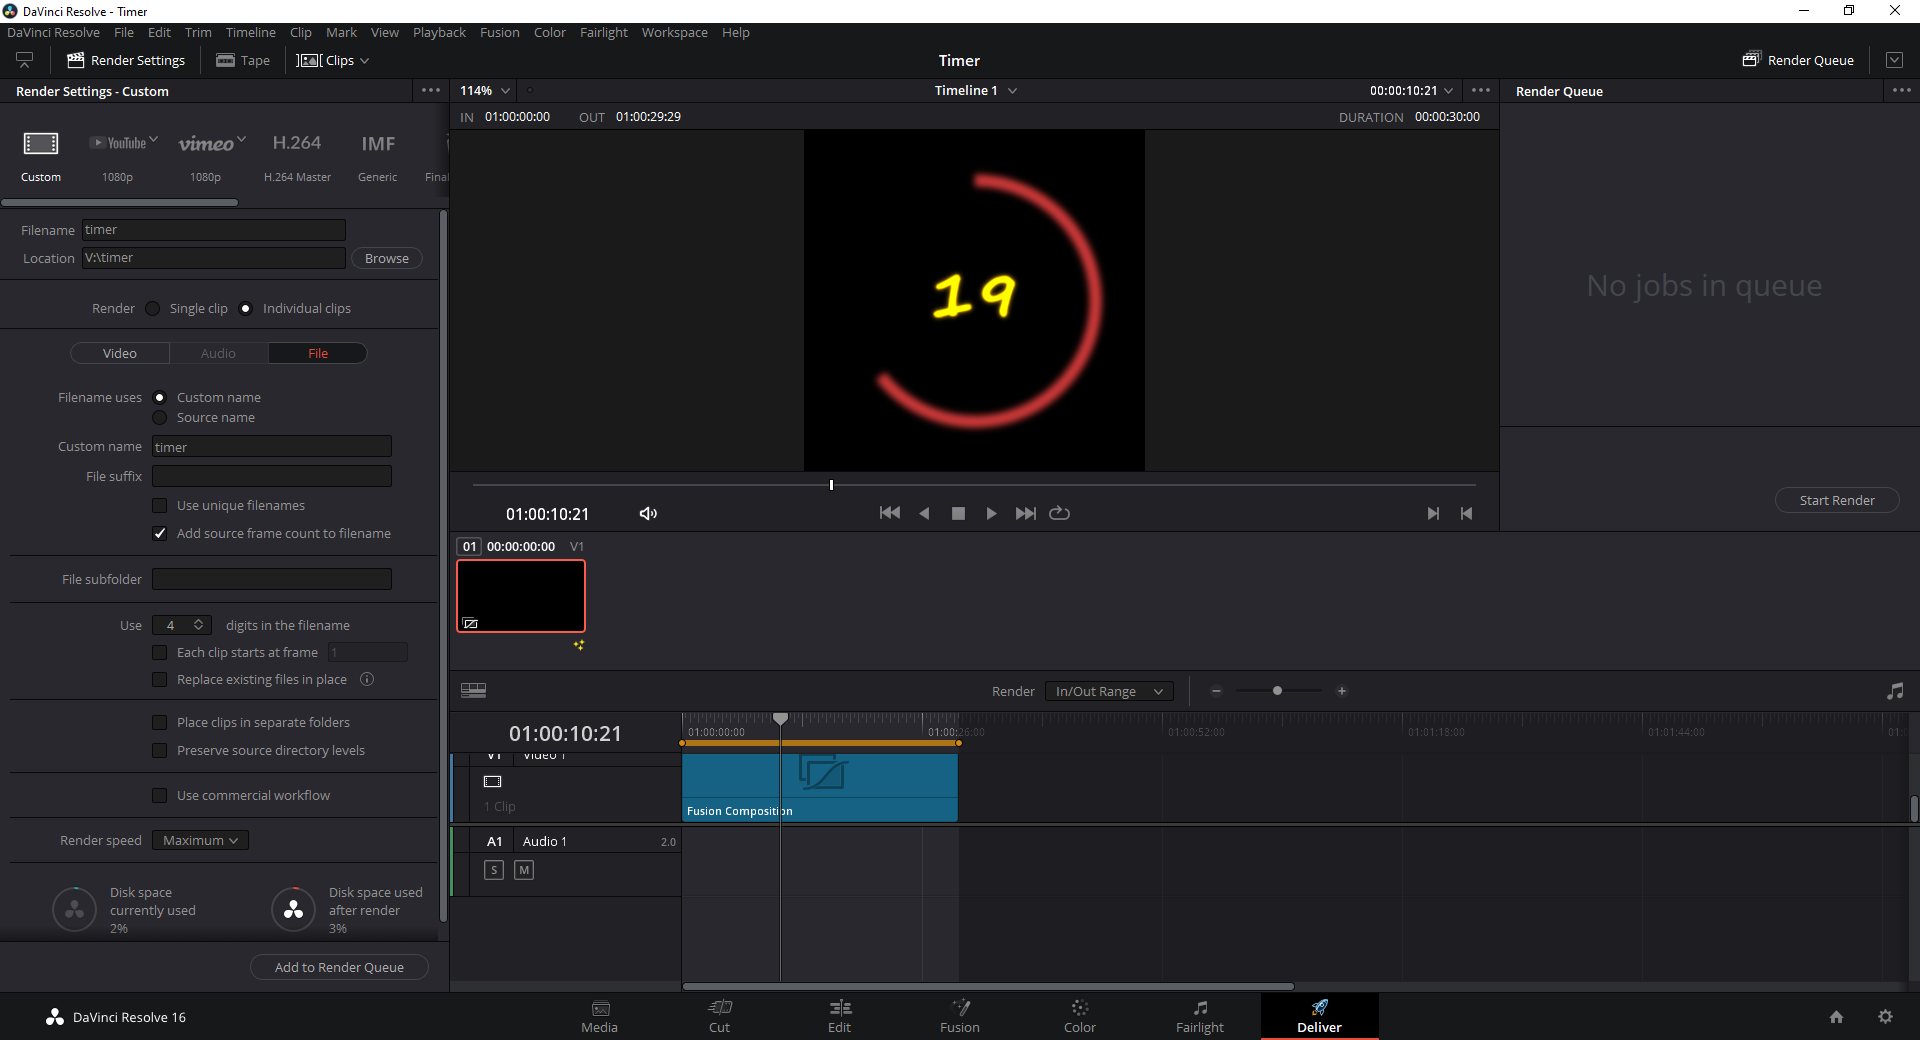
Ok lets just assume you have already done the work to create an animation sequence of TIFF images that you would like to transform into a VP9 file for distribution onto the web.
The common format for storing VP9 video is in the webm container and you can instruct ffmpeg to create a rough video with instructions like the following:
ffmpeg -i timer%04d.tif -r 30 -c:v vp9 -pix_fmt yuva420p timer.webm
| Name | Required | Description |
|---|---|---|
| i | Required | Input file(s), %04d is a 4 digit pattern |
| r | Optional | Frame Rate, default is 25 if unspecified |
| c:v | Required | Codec, VP9 here supports Alpha channel |
| pix_fmt | Required | yuva420p is required to support alpha channel |
You could choose to run 2 passes on the source material to create a slightly higher quality final product like this (on Windows):
ffmpeg -r 30 -i timer%04d.tif -c:v vp9 -pass 1 -pix_fmt yuva420p -f webm NUL
ffmpeg -r 30 -i timer%04d.tif -c:v vp9 -pass 2 -pix_fmt yuva420p timer.webm
Using FFMPEG to Encode ProRes4444 with Alpha Channel
Since ProRes enjoys wide support across most video toolchains, here is a command to create a ProRes4444 video clip from a sequence of TIFF images with alpha channel enabled.
ffmpeg -i timer%04d.tif -r 30 -c:v prores_ks -pix_fmt yuva444p10le prores.mov
| Name | Required | Description |
|---|---|---|
| i | Required | Input file(s), %04d is a 4 digit pattern |
| r | Optional | Frame Rate, default is 25 if unspecified |
| c:v | Required | Codec, prores_ks here supports Alpha channel |
| pix_fmt | Required | yuva444p10le needed for ProRes alpha channel |
Note: In my testing, using a sequence of TIF images actually takes up less space and is higher overall quality than transcoding to ProRes. Testing was not rigorous though so take this feedback with a grain of salt.
Using FFMPEG to Preprocess Video for Editing
For the rest of this article I’m going to walk through the procedure I will use to recreate a video clip that looks like this:
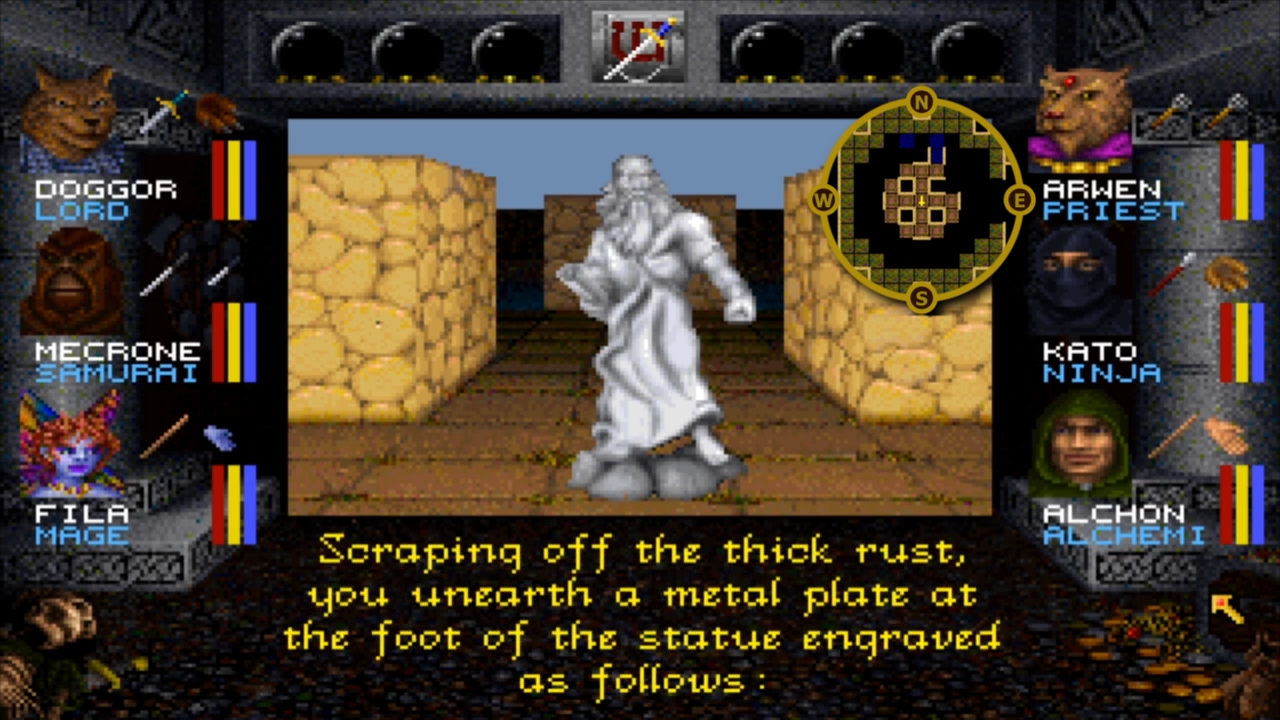
As you may or may not know as part of a hobby and wish to develop a new set of skills I have been recording gameplay footage of an old timey DOS game called Wizardry 7: Crusaders of the Dark Savant. I played the game for years as a young lad and figured I would like to share the game with the world since it was so important to my adventures growing up. The game normally plays in a 4:3 DOSBox window and with some gentle massaging I have stretched to a 16:9 aspect ratio and overlayed an out of game map into the video.
All well and good, what does this have to do with ffmpeg?
It turns out that my old workstation and the handy Davinci Resolve suite don’t really get along. It crashes all the time sadly, despite using updated drivers, magical fairy dust, and ground up chili peppers. I resorted to using ffmpeg to preprocess a number of video scenes so that Resolve has fewer things to complain (crash) about.
Particularly, the map element you can see in that image above does not exist in the original game, I am overlaying it ontop of the video when appropriate. Moreover it is being recorded from an out of game mapping tool and encoded into the same video stream as the game recording.
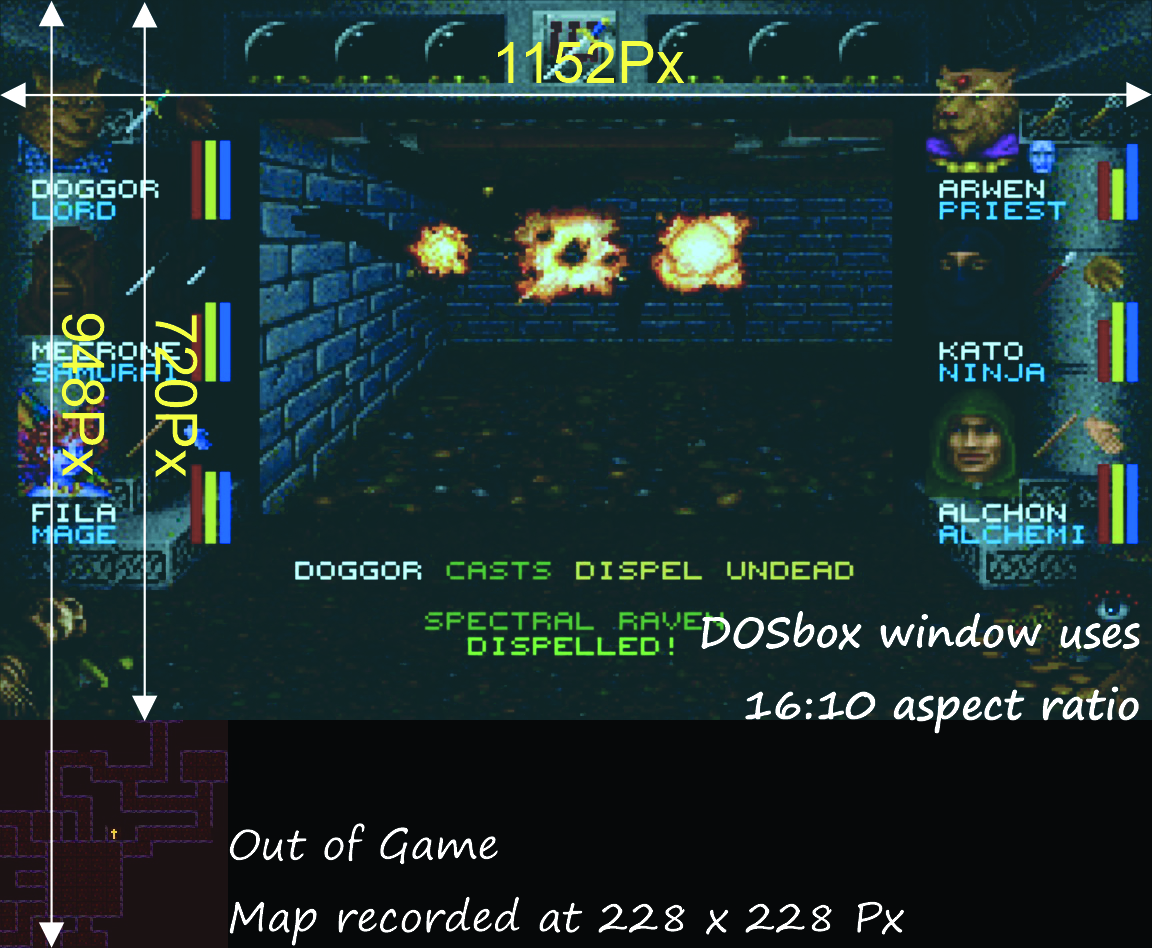
Here is where ffmpeg comes into play for my workflow. First thing, I need to crop and resize the gameplay and map into distinct video files. This is where ffmpeg really shines since it allows you to created complex video processing schemes and chain together all sorts of operations.
I am not going to walk step by step through the mechanisms that ffmpeg uses to crop video content here, this has been covered elsewhere sufficiently well that I don’t think it’s worth trying to recreate that authors guidance here.
With feedback from the above article I created a fancy batch script to preprocess my video content, lets take a look at it:
set "FG=[0]split[gp][map];"
set "FG=%FG%[gp]crop=1152:720:0:0,scale=1280:720,setsar=1:1[gps];"
set "FG=%FG%[map]crop=228:228:0:720[croppedmap];"
set "FG=%FG%[0:1]highpass=f=200,lowpass=f=3000[gpaudio]"

::echo %FG%

for %%f in (*.mkv) do (
    echo %%~nf
    ffmpeg -i "%%~nf.mkv" ^
    -filter_complex "%FG%" ^
    -map "[gps]"  -map "[gpaudio]" -map 0:2 "gp%%~nf.mp4" ^
    -map "[croppedmap]" "map%%~nf.mp4"
)
Essentially what is happening here is this, for every .mkv file in the directory, I am cropping the map and gameplay video to distinct video streams. Before saving the streams I am passing the gameplay audio through a highpass filter to remove some low-frequency sound artifacts caused by the emulation of the MPU401 sound device.
Running the script as is, results in creation of two new MP4 video files, the first being the gameplay video combining the audio track from the computer and my microphone. The second video file just contains the video of the cropped map which in turn looks just like this

This is certainly a start but I would like to recreate the same type of effect that I was able to generate in Davinci Fusion. The entire point of the first 1000 words of this article was to introduce the fundamentals required to create an alpha masked video element that can be imported easily with its alpha channel intact into my editor of choice.
Alpha Manipulation with FFMPEG
As I am writing these words I don’t actually know how to go about what I am trying to do here but lets take a look at how ffmpeg handles drawing a canvas. We’ll give ourselves a simple goal at first, lets set an entire video to 20% transparency and export it as a VP9.
ffmpeg -f lavfi -i color=color=red@.2:size=228x228,format=yuva420p ^
-t 20 -c:v vp9 redcanvas20.webm
That wasn’t so hard, but lets take a look at the command.
- Use
-f lavfias input format to the libavfilter virtual device - Set the filter input source using the
-iflag (not-vf) - Provide arguments as complete key-value pairs, like:
color=color=red - Select the
yuva420ppixel format for compatibility with vp9 alpha export.
Note: If you are planning to export to ProRes4444, be sure to use the yuva444p10le pixel format instead.
Ok so let’s try something a little more complicated, lets draw a diagonal line
and make the rest of our generated video clip transparent. We use the geq
filter to do this because it allows us to directly manipulate the
alpha level of every pixel directly using an expression. I will drop the
@.2 from the color filter as well since it won’t be needed after this.
ffmpeg -f lavfi -i color=color=red:size=228x228,format=yuva420p,^
geq=lum='p(X,Y)':a='if(eq(X,Y),255,0)' ^
-t 20 -c:v vp9 redline20.webm
Note: Before I continue I should mention that I don’t have any earlier
experience with the geq filter and similar advanced ffmpeg filtering
techniques. All the examples you are reading here are created from snippets
I have found left in old emails and user questions on the web combined with
a snippet of late night coffee and figuring it out for myselfedness.
Lets disect the geq filter written above:
geq=lum='p(X,Y)':a='if(eq(X,Y),255,0)'
    |----------| |-------------------|
         |                 |
     Luminance     Alpha Expression
As best I can tell, every geq filter command requires a luminance
expression. The p(X,Y) expression here returns the current luminance value
for each pixel and sets it to itself. Since we need some expression
here, setting the image to its source values is preferred.
The second part of the filter is the optional alpha channel expression,
where we manually calculate the desired alpha channel for every pixel. In our
example here if(eq(X,Y),255,0) is our expression, which says roughly if
the X and Y coordinates are equal, set the current pixels alpha channel to
255, otherwise set it to 0. What results is a straight diagonal line that
your grade school algebra teacher taught you all about in grade 7. Try it for
yourself, and fiddle with the expression, you can generate any angle you want
if you remember the old slope formula:
Evaluating FFMPEG Expressions
Drawing the line was pretty straight forward, but how did I know to use the
if(eq(X,Y),255,0)? Well truthfully I saw an example of this on some old
mailing list archive, but it dawned on me that ffmpeg has a large collection
of expressions that we can use.
The expression documentation on the ffmpeg website lists a full set of expressions that we can use when designing our formulas. But I will share a handful that catch my eye:
| Expression | Description |
|---|---|
| if(A, B, C) | If \(A \neq 0\) return \(B\), otherwise return \(C\) |
| gte(A, B) | Return \(1\) if \(A \geq B\) |
| lte(A, B) | Return \(1\) if \(A \leq B\) |
| hypot(A, B) | Returns \(\sqrt{A^2 + B^2}\) |
| round(expr) | Rounds expr to the nearest integer |
| st(var, expr) | Save value of expr in var from \(\{0, \dots, 9\}\) |
| ld(var) | Returns value of internal variable var saved with st |
There are also a number of predefined variables:
| Variable | Description |
|---|---|
| N | The sequential number of the filtered frame, starting from 0 |
| X, Y | Coordinates of the currently evaluated pixel |
| W, H | The width and height of the image |
| T | Time of the current frame, expressed in seconds. |
Drawing shapes in FFMPEG with Alpha!
Alright so lets practice a bit with the geq filter and see if we can create commands that can draw some simple shapes and patterns.
Set lower third of video opaque:
ffmpeg -f lavfi -i color=color=red:size=228x228,format=yuva420p,^
geq=lum='p(X,Y)':a='if(gte(Y,2*H/3),255,0)' ^
-t 20 -c:v vp9 redlowerthird20.webm
This might catch you by surprise but look at the expression gte(Y,2*H/3)
or \(Y \geq \frac{2}{3}H\). It may seem odd that setting the lower third of
the video to opaque is done by filtering for pixels with a \(Y\) coordinate
greater than \(\frac{2}{3}\) of \(H\). The reason for this is that the top
left of the image is actually \((0,0)\) and the \(Y\) coordinate goes up
as we move towards the bottom of the image. There is surely some sort of
official name for this but you need to become familiar with working in this
mirrored positive coordinate space.
Lets try another, lets fill in the top right diagonal with opaque pixels:
ffmpeg -f lavfi -i color=color=red:size=228x228,format=yuva420p,^
geq=lum='p(X,Y)':a='if(lte(Y,X),255,0)' ^
-t 20 -c:v vp9 redtopdiagonal20.webm
Now, pixels where \(Y \leq X\) are transparent and others are opaque which gives this pattern you can see here where the bottom left diagonal half of the image is transparent.
So far so good? I hope your algebra and graphing lessons from when you were 12 are coming back.
Draw a circle in FFMPEG
Lets try something more complicated and try to draw a circle in ffmpeg with a radius of 100 pixels. But before we get into this let’s go back to grade 7 math again because we need to remind ourselves about the identities related to circles.
A circle’s radius \(R\) is described by Pythagoras:
\[X^2 + Y^2 = R^2\]So if we want to draw a circle we just need to set any pixel opaque where:
\[\sqrt{X^2 + Y^2} \leq R\]Also do you remember my table of fancy expressions available in ffmpeg?
Specifically, we should use hypot(A, B) as part of our command, so it should
look a bit like this:
ffmpeg -f lavfi -i color=color=red:size=228x228,format=yuva420p,^
geq=lum='p(X,Y)':a='if(lte(hypot(X,Y),100),255,0)' ^
-t 20 -c:v vp9 redcircle20-1.webm
Well, that doesn’t look correct. What have we done wrong? Well we’ve drawn the circle around the origin of the our coordinate base so we end up missing 75% of our circle! We need to translate our circle over a smidge, so lets figure out the math behind translating a circle.
It turns out that a quick read of my grade 3 math textbook indicates that the origin of a circle can be translated to any point \((A,B)\) with the following identity:
\[(X-A)^2 + (Y-B)^2 = R^2\]So far so good, and if we want to place our circle in the center of our canvas we need to use \(A=\frac{W}{2}\), \(B=\frac{H}{2}\) which leads to:
\[\sqrt{(X-\frac{W}{2})^2 + (Y-\frac{H}{2})^2} \leq R\]Adapting that to our ffmpeg command we can move the origin to the center of our canvas like this:
ffmpeg -f lavfi -i color=color=red:size=228x228,format=yuva420p,^
geq=lum='p(X,Y)':a='if(lte(hypot(X-(W/2),Y-(H/2)),100),255,0)' ^
-t 20 -c:v vp9 redcircle20.webm
Tada!
Alpha Masking with FFMPEG
Ok kids, we’re finally getting to the meat and potatoes of the article. We now understand the basics behind drawing shapes, and we want to use those shapes as masks to make part of a video transparent. Do you remember that image of the raw map from my classic computer game? Well, lets take what we have learned to mask out a circle in that map video
We will need two new ffmpeg filters alphaextract and alphamerge. The
alphaextract filter takes the alpha component and outputs grayscale, the
alphamerge filter takes grayscale input and a target video source and masks
the target.
Usage of these commands looks a little bit like this.
ffmpeg -f lavfi -i color=color=red:size=228x228,format=yuva420p,^
geq=lum='p(X,Y)':a='if(lte(hypot(X-(W/2),Y-(H/2)),100),255,0)' ^
-i map.mp4 ^
-filter_complex "[0]alphaextract[a];[1][a]alphamerge" ^
-c:v vp9 maskedmap.webm
This is how you add a circular mask over a video with ffmpeg! Cool.
Finishing touches
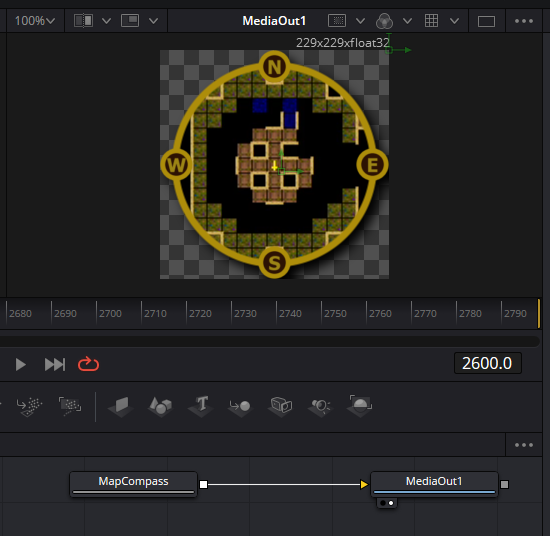
We still are not quite finished, as you may have noticed I did not take the time to feather the alpha mask on the map video above so the edges of the video are quite sharp. I could have written an expression to soften the edge of the mask, and I may show how to do that in a future article, but in this case I want to actually apply another effect to my map entirely.
I want to take this image that I drew in CorelDRAW using my vast experience of occasionally making posters once every half decade and overlay it onto our masked map to create a more polished final result.

ffmpeg -f lavfi -i color=color=red:size=228x228,format=yuva420p,^
geq=lum='p(X,Y)':a='if(lte(hypot(X-(W/2),Y-(H/2)),90),255,0)' ^
-i map.mp4 ^
-i mapcompass-1.png -loop 1 ^
-filter_complex "[0]alphaextract[a];[1][a]alphamerge[mask];[mask][2]overlay" ^
-c:v vp9 finishedmap.webm
The result looks like this:
Summary
What should you take away from this extensive article? Well, for one thing I hope that I have demonstrated that you can create decent composite video with ffmpeg. Certainly the user interface is not fluid or easy to understand like the more robust tools (eg. Davinci Fusion or After Effects), but with patience you can absolutely create decent effects. Moreover, the platform is absolutely stable in comparison to Resolve, which as I mentioned is completely hideous to use on my computer.
I think that scripted systems like the one we created here today truly have their place in handling pre-rendered scenes and animations. I don’t have any idea how much value this kind of documentation is to the world at large, since I am fairly certain that people generally just want to use a point and click environment to produce their whirlywoos but I’m glad that I took the time to write everything down here. I know I will personally be using scripts like the one we created.
Thanks for reading! Also take some time and watch my derpy YouTube stuff to see how it all turns out.